Showing posts with label Breakfast. Show all posts

May 13, 2016

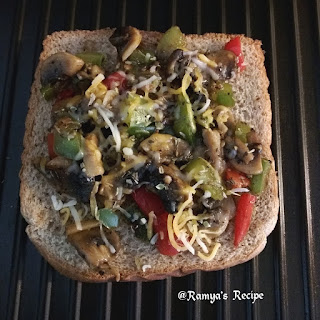
Mushroom Bellpepper sandwich


Ingredients

Bread - 10 slices
Button Mushroom - 200 gms
Green bell pepper - 1
Red bell pepper - 1
Crushed pepper - 1 TSP
Salt as needed
Shredded cheese - 5 tbsp
Or
Cheese slices - 5
Olive / any oil - 1 tbsp
Italian seasoning - as needed

Preparation

1. Slice the mushroom and chop the Bellpepper to very small pieces.
2. In a pan add the veggies along with oil, pepper and salt and stir fry on high heat. The veggies give out a lot of water. Stir fry till it becomes dry.
3. Take a bread slice. You may apply some butter if needed. Spread the veggie mix evenly. Top it with 1 tbsp shredded cheese. I used a mix of mozzarella and cheddar. If you are using cheese slices, place it on top of the veggies. Sprinkle a little Italian seasoning. Cover with another bread slice.
3. Grill till sandwich is lightly browned.


Serve hot.

April 29, 2012

Cheesy Sweetcorn and Bellpepper sandwich


Ingredients:

Makes 5 sandwiches

Sweetcorn - 150 gms (I used frozen)
Green bellpepper/capsicum - 1
Onion - 1
Oil - 1 tbsp
Salt - to taste
White or black pepper powder - 1/2 tsp or to taste
Brown bread slices - 10
Butter - as needed
Cheese slices - 5

Preparation:

1. Thaw the sweetcorn. Remove the seeds of the bellpepper and chop finely. Peel the onion and chop it.
2. Heat oil in a pan and add Onion, sweetcorn and bellpepper. Add salt and saute for about 5 minutes. Add pepper and combine well.
3. Take a slice of bread and spread the sweetcorn mix. Place a cheese slice and cover it with another slice of bread. Brush a little butter on the outer sides of the sandwich.
4. Grill or toast the sandwich.Serve hot !

Events:
Cooking Concepts:Spring seasonal food hosted by Sravs
Souper Sunday hosted by Deb
Bon Vivant Moments #3 - Breakfast Ideas hosted at Sumee's Culinary Bites
Showcase: What's in your lunchbox hosted by Divya
Let's make sandwiches hosted at Simply Food
Guest Quest hosted by Amina


July 23, 2011

Carrot and Egg Sandwich


Looking for a healthy and filling sandwich? Then, try this...

Ingredients:

Bread slices - 8 
Carrots - 3 medium, grated
Onion - 1 small sized, chopped fine
Green chillies - 3 or 4, slit
Eggs - 3
Mustard seeds or Jeera - 1/2 tsp
Salt
Oil

Preparation:

1. Heat about 1 tbsp of oil in a pan and add mustard or jeera whichever you like. Add onions, green chillies and salt and saute till onion starts turning brown.
2. Add grated carrots and saute for a few minutes. Add eggs one by one, mixing well with the carrots. You may also beat eggs separately with a little salt and then add to the carrots as I did. The filling is ready. Remove the green chillies before spreading on bread. 
3. Take a slice of bread and top it with the filling. Cover with another slice and then toast in a sandwich maker/toaster. 


Linking to Anyone can cook: Series 27


July 20, 2011

Rava Idli


Some of my friends have been asking for an easy Rava Idli recipe and here it is...This morning I was so lazy to prepare breakfast, and this came to my rescue. There is no need to plan ahead, soak, grind or ferment unlike the regular idli. Within 30 minutes, yummy rava idli is ready...My little girl who doesnt eat rava upma, will happily have this one. Adding carrots and beans  makes it colourful and healthier too. Rava idli can be had for breakfast, with evening tea( if you are really hungry) or for dinner...

Ingredients:

Rava/Semolina - 1 cup
Jeera - 1/2 tsp
Chana Dal - 1 tbsp
Finely chopped Ginger - 1/2 tsp
Thick Curd/yoghurt  - 2 cups
Baking soda - 1/2 tsp (makes idli very fluffy and soft)
Carrot - 1 or 2, grated (optional, but it makes the idli healthier and gives a light orange shade to it)
Coriander leaves - a few, chopped
Salt
Oil 

Yields around 10-12 idlis.

Preparation:

1. Heat a little oil in a pan and add jeera followed by Chana dal and ginger and saute. You may also add chopped cashew nuts if you like. Add Rava and roast till golden. Turn off the stove and let it cool.
2. Add grated carrot, coriander leaves,salt and curd. Add baking soda and mix well and keep aside for 10 mins. You may add finely chopped beans also to this.
3. The idli mix thickens after 10 mins. Add a little more curd or water. The mix should be thicker than regular idli batter.
4. Grease idli moulds with a little oil. Scoop the idli mix into the moulds and steam for 10-15 mins till idlis are cooked.
5. Let it cool for sometime and remove from moulds.

Serve with Onion chutney, Tomato chutney or any other chutney of your choice. Sometimes I just eat it as it is and it tastes good too..


July 12, 2011

Adai Dosa


Adai dosa is considered to be the most nutritious among all dosas as it has the goodness of lentils along with rice. Lentils are a good source of protein and dietary fiber. Adai is a delicacy of tamilnadu and I had it first time at Adayar Ananda Bhavan(A2B). I had no clue of what goes in to that dish, until I visited my friends place and got the recipe from her cook. This is a healthy dosa for kids too, and I am so happy that my little one loved it.

So, here is the recipe...

Ingredients:

Idly rice - 1 cup
Urad dal - 1/4 cup
Chana dal - 1/4 cup
Toor dal - 1/4 cup
Green gram/moong - 1/4 cup
Fenugreek seeds - 1/2 tsp

Shredded coconut - 1/2 cup
Green chillies - 3 or 4
Ginger - 1 inch peice
Jeera/Cumin seeds - 1 tsp
Salt
Water

Pepper powder - 1/2 tsp or more (optional)
Onion - 1, finely chopped
Chopped coriander - a handful
Oil

Preparation:

1. Wash and clean the idly rice and the 4 dals and soak in water along with ,fenugreek seeds for a minimum of 4 hours. If you are planning to make it for breakfast, soak overnight.
2. Add coconut, green chillies, ginger, cumin,salt and enough water to the soaked ingredients and grind it to a smooth batter. The consistency is almost same as the regular dosa batter.
3. Add chopped onion, coriander leaves, pepper powder and keep aside for 10-15 mins. You may prepare chutney in the meantime.
4. Heat the dosa tava and grease it with a little oil. Pour a ladle full of batter and spread it with the back of the ladle to a form a circle. Cover with a lid and cook on medium-low flame till cooked. Drizzle few drops of oil and flip to the other side and cook for a few more seconds. Transfer to a plate.

Serve hot with chutney. The chutney in the picture above is Onion Chutney. You may also serve it with Tomato Chutney.

Sending this to Proteinicious hosted by Sobha of Good Food


Sending this to Show me your Dosa hosted by Divya


Linking this to Life is Green Event 

Also goes to Dosa recipes hosted by Sameena

July 10, 2011

Mushrooms and Egg on Toast


I am very lazy to cook breakfast on weekends. So, toast with jam or marmalade,eggs etc are the usual items. Today I just added some mushrooms to egg and the result was a filling sandwich. The unusual thing is that my little girl who is not fond of mushrooms had  lots of  it today and told me it is supaa(her word for super)...I am not happy with the picture above as it was a gloomy morning with no sunlight  and I had no time to take something better. Will try to post a better pic next time when I make this..

Ingredients:

Closed cup or button mushrooms of medium size - 5 to 6, finely sliced
Onion - 1/2 chopped
Garlic - 2 cloves, chopped
Pepper powder - 1 tsp (adjust)
Eggs - 3
Bread slices - 6 to 8
Mayonnaise - for bread spread
Salt
Oil

Preparation:

1. Heat about 1 tbsp of oil in a pan and add mushrooms, onion, garlic and salt.Saute for a few minutes. Mushroom releases water while getting cooked.
2. Add pepper powder and saute till water has evaporated. Break the eggs and scramble well. (You may beat the egg with a little salt before adding to mushrooms if you like it that way). Saute till egg is cooked.
3. Toast the bread slices on  electric toaster or tava. Spread mayonnaise and then top with the mushroom egg mix. Cover with another bread slice. Yummy sandwich is ready.

It can be served as breakfast or a snack. Also suitable for packing kid's lunchbox.

Sending this to Healthy Snacks event hosted by Deepthi


This recipe also goes to Sandwich Mela hosted by Srivalli of Cooking 4 all seasons


July 8, 2011

Neer Dosa


Neer Dosa is a delicacy of Dakshina Kannada region of Karnataka. Neeru means Water in Kannada and I am told that it is known as Neer Dosa as the batter is of a watery consistency. Neer Dosa differs from Regular Dosa, as it doesn't include Urad daal and there is no need to ferment the batter after grinding. This dosa is very thin and yummy and you need lots of them to fill your tummy.  I never made neer dosa when I was in Bangalore as it was available in our office cafeteria and most of the restaurants. After coming to UK, there was no other way than to cook it on my own.

Ingredients:

Raw Rice - 2 cups (I didn't have it so I used Idly Rice)
Shredded coconut - 1/2 cup
Salt
Water
Oil - to grease the pan

Preparation:

1. Soak the raw rice in water for a minimum of 4 hours. If you are planning to have it for breakfast, soak overnight and grind in the morning. The batter can be used soon after grinding as fermentation is not required.
2. Grind it along with shredded coconut to get a smooth batter.
3. Add salt and more water to make it to a watery consistency. It should be much thinner than the regular dosa batter.
4. Heat a dosa tava and grease with oil. If you are using a non stick tava, you dont need oil at all. Pour a ladle of batter and swirl the tava immediately so that the batter forms a uniform thin layer on the tava. When the dosa is cooked, use a spatula to fold it. Transfer to a plate.

Refer this video...

Neer dosa can be served with chutney. Non-vegetarians have a lot of choice as neer dosa goes very well with fish and non-veg curries. Here is one combo you can  try: Fish in Roasted Coconut Gravy

Sending this to Show me your Dosa hosted by Divya


Also goes to Dosa recipes hosted by Sameena

July 7, 2011

Rava Dosa


Rava dosa is a tasty and easy to cook option for a quick breakfast or dinner. The advantage of rava dosa over the regular dosa is that it doesn't involve soaking of ingredients, grinding, fermenting etc. I never thought I could make crisp rava dosa like the restaurant ones, because my dosas always turned out to be a little softer. It was recently that I found that the batter has to be of watery consistency to get crisp dosas and this tip came from Sanjay of Vahrevah. So, now my rava dosas are as crispy as restaurant ones, thanks to Sanjay.

Ingredients:

Rava/Semolina - 1 cup
Rice Flour - 1 cup
Maida/Plain Flour - 1/2 cup
Jeera/Cumin seeds - 1 tsp
Crushed black pepper - 1 tsp
Onion - 1, finely chopped
Finely chopped Ginger - 1 to 2 tsp
Yoghurt - 2 tbsp (optional)
Coriander leaves - a few, chopped
Salt
Water
Ghee or Oil

Preparation:

1. In a bowl, mix rava,rice flour and maida. Add jeera, pepper, onion, ginger, yoghurt, salt and lots of water to make a very watery batter. Check Sanjay's video to get an idea of the batter consistency. I usually keep this batter aside for about 20 minutes and  make chutney  in the meantime.
2. Heat a flat dosa tava. As the batter is watery, you cannot pour it like the normal dosa batter. So, sprinkle the batter on the hot tava using a ladle or your hand. The dosa has to be cooked on medium-high flame and it takes more time to cook than regular dosa. When it is almost cooked, drizzle ghee or oil. The dosa gets crisp and separates from the edges. You can flip to the other side to make it even crispier.

Serve with any chutney of your choice. Why not try my Onion Chutney or Tomato Chutney?

Sending this to Show me your Dosa hosted by Divya


Also goes to Dosa recipes hosted by Sameena


June 30, 2011

Paneer Burji Sandwich


Paneer burji is a good recipe idea if you have some left over paneer. This burji can be used in a variety of ways: can be served with rice or roti as a side dish, as a sandwich filling or as a wrap filling. You may substitute paneer with soya chunks and follow the same recipe. I used this for a sandwich and it was really good and quite filling. Paneer is rich in proteins and kids will also love this sandwich.

Ingredients:

Paneer cubes - 1 cup
Oil - 1 tbsp
Jeera/Cumin seeds - 1/2 tsp
Onion - 1, finely chopped
Ginger garlic paste - 1 tsp
Turmeric powder - a pinch
Chilly powder - 3/4 to 1 tsp
Tomato - 1, finely chopped
Salt
Garam masala - 1/2 tsp (Check cooking tips for the recipe)
Coriander leaves - chopped for garnishing
Bread slices - 6 to 8

Preparation:

1. If you are using store bought paneer cubes, soak it in hot water for 5-10 mins to make it soft. Drain to kitchen towel. Crumble the cubes with your fingers and keep  it aside.
2. Heat oil in a pan and splutter cumin seeds.
3. Add onion and saute till it starts turning light brown.
4. Add ginger garlic paste and saute for a minute.
5. Add turmeric,chilly powder, salt and mix well.
6. Add tomatoes and saute till they are soft.
7. Add paneer cubes and combine well. Add garam masala. Stir fry for about 5 mins till paneer is cooked and the mix becomes dry.
8. Add coriander leaves and mix well.
9. Take a slice of bread and spread the filling. Cover with another slice of bread. You may toast or grill the sandwich if you like it that way.

Sending this to Proteinicious hosted by Sobha of Good Food, Quick and Easy Recipe Mela hosted by SpicyTasty and to Sandwich Mela hosted by Srivalli of Cooking 4 all seasons

June 29, 2011

Appam and Vegetable Stew


Appam and stew is a traditional breakfast of Kerala. The recipe for Appam and stew varies in different regions of Kerala.  Stew can be prepared only of potatoes, or mixed vegetables, or even chicken or mutton. Given here is the recipe of appam and vegetable stew we make at home. I have used potaotes, carrot and beans for this stew. You may add green peas and cauliflower too.

Ingredients for Appam:

Raw rice or Idly rice - 2 cups
Cooked rice  - 1 cup
Shredded coconut - 1 cup (or subsitute with Coconut milk - 3/4 cup)
Sugar - 2 tsp
Salt
Water
Dried Yeast / Fast action yeast - 1 tsp
Bicarbonate of Soda/ Baking soda - 1/2 tsp


Preparation of appam batter:

1. Soak the raw/idly rice in water for 5-6 hours.
2. Add cooked rice, coconut, sugar, salt to the rice and grind it to a smooth batter. If you are using coconut milk, add it after grinding. The batter should be a pouring consistency and a little thinner than dosa batter.
3. Add yeast and baking soda to the batter and mix well. Keep this batter overnight for fermentation. In winter, it takes more time to ferment, so keep it in a warm place( eg: near the room heater).

Making the appam:

Appams are traditionally made in iron skillet called "appa chatti". I use a Prestige non-stick appam pan. Appams have a soft fluffy center and a lacy border which comes very well on iron skillet. The advantage of using a non-stick pan is that you need not use a single drop of oil for making appams. For iron skillet, you need to lightly grease it with oil before making appam.

1. Pour a ladle full of batter (approx 3 tbsp) in a hot skillet or appam pan and swirl it immediately. A thin later of the batter sticks to the sides of the pan and a small pool of batter in the middle.
2. Cover with a lid and cook on low flame till the center of the appam is cooked and the lacy border starts getting detached from the pan.


If you do not have an iron skillet or the appam pan, you can still make appam on a dosa tava. But you wouldn't get the lacy borders.

1. Pour a ladle full of batter on a hot dosa tava. Do not spread it with a spoon. The batter would spread by itself to a neat circular shape. Cover and cook on low flame till done. You may want to flip to the other side and cook if you like.

Appam made on dosa tava will look like this pic.


Appams can be served with veg or non-veg stews, kadala curry, potato curry, egg masala, and other non-veg gravies.

Ingredients for Vegetable Stew:


Oil - 1 tbsp
Green cardamom - 2
Cinnamon stick - a  small piece
Onion - 1, sliced
Chopped Ginger - 2 tsp
Green chillies - 3 or 4, slit
Potatoes - 2, diced
Carrot - 1 or 2, diced
French Beans - 4-5, cut
Curry leaves - a sprig
Thick Coconut milk - 3/4 to 1 cup
White Pepper powder - 1/2 tsp (optional)
Salt
Water

Preparation:

1. Heat oil in a pan and add cardamom and cinnamon and saute. Add onions, ginger and green chillies and saute for a couple of minutes.
2. Add potatoes and carrots, salt and water and cover and cook cook till they are 3/4th cooked.
3. Add the beans and cook till the veggies are done. Mash a few pieces of potato to make the gravy a little thicker
4. Pour coconut milk and add curry leaves and simmer for few minutes. Add pepper powder. I add it to balance the taste of coconut milk and to make the curry a little spicier.


Note: This is the recipe I follow at home. I have had different versions of stew from different regions of kerala, and I am not sure which is the most authentic. All I can say is that this tastes great with appam or even roti.

Sending this to the Kerala Kitchen event hosted by Magpie this month.
Related Posts Plugin for WordPress, Blogger...